yo wassup flutter devs!!
Flutter apps make over 1 billion API calls per day, connecting to a wide variety of services.
From fetching weather data to retrieving user profiles, APIs are the backbone of many Flutter apps.
If you're not tapping into this power, you're missing out!
Introduction
In today's digital age, data is the new gold. And how do we access this gold?
Through APIs! With Flutter's incredible UI capabilities and the power of APIs, you can create dynamic, data-driven apps that provide real-time information to your users.
In this blog post, we'll guide you through the process of connecting your Flutter app to a REST API, ensuring you can fetch, display, and manipulate data seamlessly.
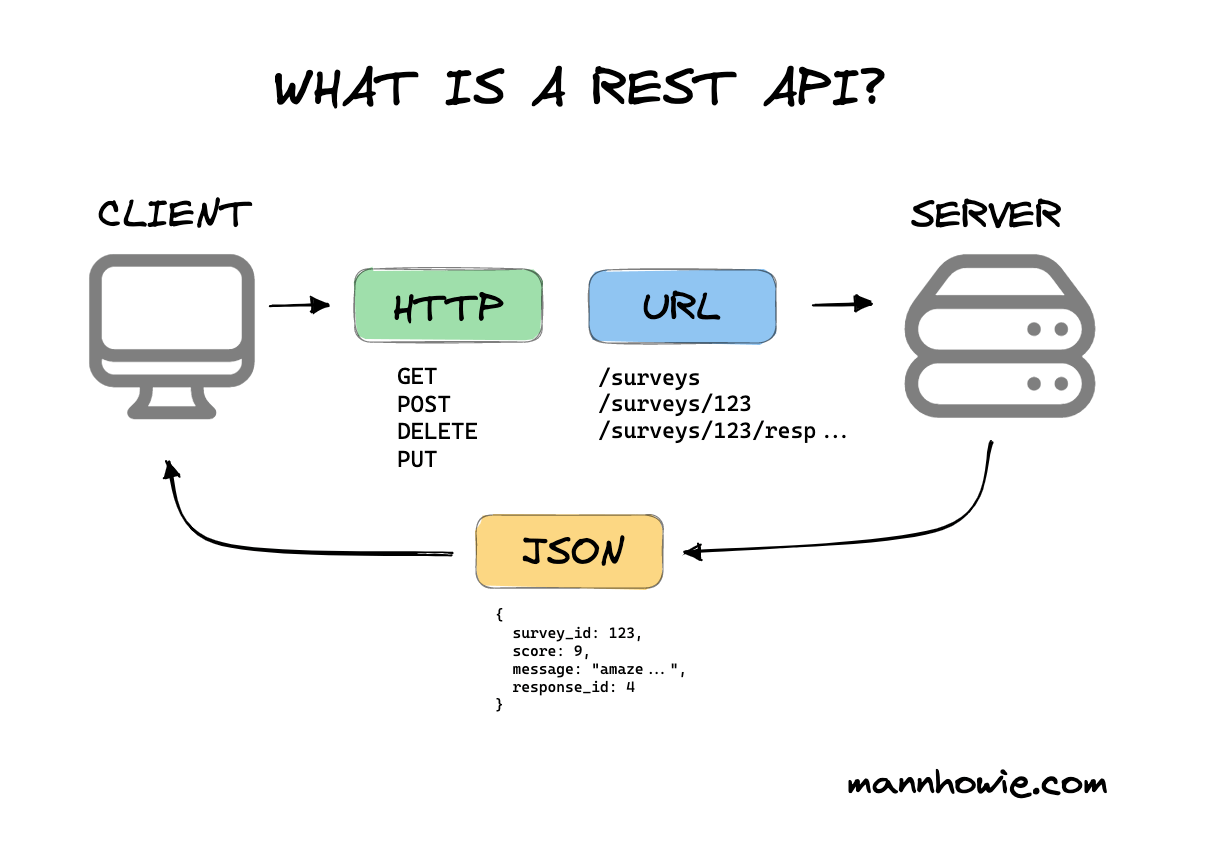
What is a REST API?

Before diving into the code, let's understand what a REST API is. Representational State Transfer (REST) is an architectural style that defines a set of constraints to be used for creating web services.
In simpler terms, it's a way for your app to communicate with a server, fetch data, and update data.
Setting Up Your Flutter App
Create a New Flutter App
flutter create api_flutter_appAdd Dependencies Open your
pubspec.yamlfile and add the following dependencies:dependencies: flutter: sdk: flutter http: ^0.13.3Fetch the Packages
flutter pub get
Connecting to the API
Import the Required Packages
 import 'package:http/http.dart' as http;
 import 'dart:convert';
Fetch Data from the API Create a function to fetch data from your desired API.
 Future<Map<String, dynamic>> fetchData(String apiUrl) async {
   final response = await http.get(Uri.parse(apiUrl));
   if (response.statusCode == 200) {
     return json.decode(response.body);
   } else {
     throw Exception('Failed to load data from the API');
   }
 }
Display the Data Use a
FutureBuilderwidget to display the data fetched from the API.FutureBuilder<Map<String, dynamic>>( future: fetchData('https://api.example.com/data'), builder: (context, snapshot) { if (snapshot.connectionState == ConnectionState.done) { if (snapshot.hasError) { return Text('Error: ${snapshot.error}'); } else { return ListView.builder( itemCount: snapshot.data.length, itemBuilder: (context, index) { return ListTile( title: Text(snapshot.data[index]['title']), subtitle: Text(snapshot.data[index]['description']), ); }, ); } } else { return CircularProgressIndicator(); } }, )
Conclusion
Connecting your Flutter app to a REST API is a game-changer. It allows you to create dynamic, real-time apps that provide immense value to your users.
With the steps outlined above, you're well on your way to harnessing the power of APIs in your Flutter apps.
Remember, the world of APIs is vast. Explore, experiment, and elevate your Flutter apps to new heights!
Before We Go...
Hey, thanks for sticking around! If this post was your jam, imagine what’s coming up next.
I’m launching a YouTube channel, and trust me, you don't want to miss out. Give it a look and maybe even hit that subscribe button?
Until we meet again, code on and stay curious! 💻🎉
Got any doubt or wanna chat? React out to me on twitter or linkedin.
